Please enable JavaScript to view this site.
CPPD currently supports three types of Print output. If you wish to send your output to a Printer then select one of the following Print types from the list.
Print (SCS) |
SNA Character Stream Printer, a simple text printer. |
Print (AFP) |
Advanced Function Printer; Feature rich printing including fonts, images and barcodes. Requires an AFP compatible printer. If you have an AFP FS45 or PDF Direct capable printer, then you may produce colour output. |
Print (HPT) |
Host Print Transform; similar to AFP but with an additional transformation to create an output compatible with a wide range of printers. If you have IBM V7R1 or V7R2 with the latest PTFs then you may produce colour output. |
The Print Output Device Properties are split into three tabs:
|
|
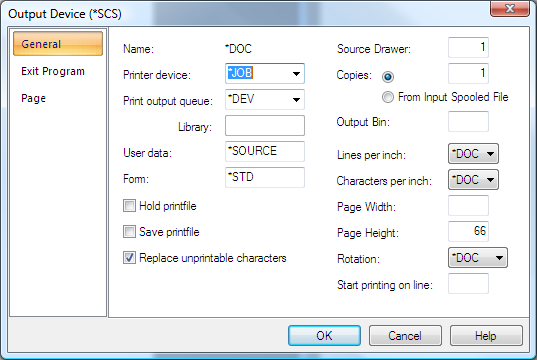
Print SCS Settings |
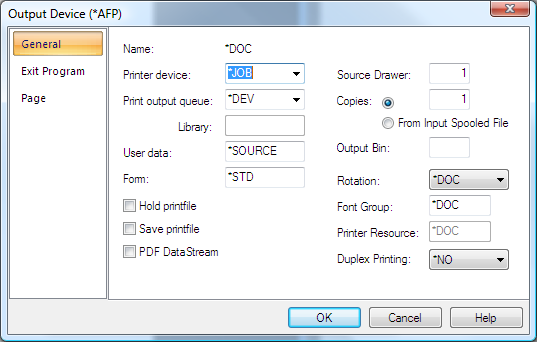
Print AFP Settings |
|
|
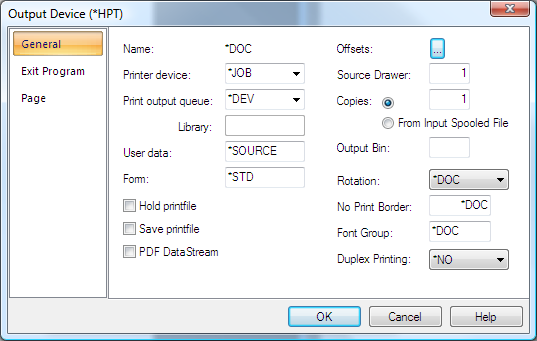
Print HPT Settings |
The General settings (on the General tab) are similar for each type of Printer Output Device, where a setting is specific to a particular type of output device the type is specified in brackets.
Printer Device/ Output queue & Library
You either need to enter a Printer Device name or an Output queue name together with the library name where it may be found.
If using an Output queue just blank out the *JOB from the Printer device and enter an Output queue name; this will then allow you to enter a library name.
You may specify *USR in the Output queue name. This will allow printing to different Output queues dependent upon user. If you specify *USR you must then set up your PPD users within CPPD on the IBM i (refer to Work with PPD Users). If this is not done the print will be directed to the users’ default Output queue. Using *DEV will print to the users’ default Output queue, the user being the owner of the spooled file.
When using *JOB in the Printer Device the output will be directed to the jobs’ default device.
User Data
This entry will allow you to carry forward the User Data from the input spooled file by leaving the default of *SOURCE or to enter your own User Data.
Form
If you wish to change the Forms Type of your generated print file then enter the required name here.
Hold print file/Save print file
These entries relate to the generated print file. If these are not selected then the print will be written in the Ready state.
PDF DataStream (AFP HPT)
If you check this box then your output will be generated as a PDF data stream. This enables colour printing and can only be used if you have a PDF Direct capable printer.
Note: Your PDF Direct capable printer is configured on the IBM i in the same way as a LAN attached printer device for Host Print Transform only specifying *NO as the transformation. PDF direct can only be used if your version of Spool-a-Matic is V2R3M0 or higher. You will also need to make sure that the PDF image process blending includes *PREBLEND32 - see Configuring Spool-a-Matic for PDF Direct printing for details. If you are adding images to your output then you will need to define the Image Format as JPEG if you are using PDF direct capability as TIFF LZW does not work correctly.
Offsets.. (HPT)
These offsets enable you to separately move your selected images and/or text on your printed page. If your printed output does not match the data positioned on your output pane (i.e. your text does not line up with your image) then you need to create your own offsets for your printer. Highlight the Preset name (Bottom left hand field) and re-name it for your own printer type, then alter the parameters and click on Add to create your own default offsets. You may need to create a separate preset file for each of your different printer types.
Replace unprintable characters (SCS)
Select this option if you wish to replace any unprintable characters with a space.
Source Drawer
Here you can specify the source drawer used when single-cut sheets are semi-automatically fed into the printer.
1 – 225 |
The printer paper drawer to be selected (default 0001) |
*E1 |
The envelopes are fed from the envelope drawer on the sheet-feed paper handler |
Copies
If you wish for more than one copy of each print then enter the number here, alternatively you may select to use the number of copies based upon the number of copies of your input spooled file by clicking the From Input Spooled File radio button.
Output bin
Here you can specify the destination of the output on printers capable of multiple output bins. Valid entries are:
1-65535 |
Specify the output bin for the destination of the output. |
*DEVD |
The destination of the output is the device default output bin. |
Lines and Characters per inch (SCS)
These are best left as *DOC as the lpi and cpi for the document should have been selected when you defined your Page Set-up.
Page Width (SCS)
If left blank then the width of the generated SCS output will be 374 characters per line. If you wish you can specify your own page width but this must obviously be greater than or equal to the number of characters that you wish to fit on one line.
Page Height (SCS)
This should only be adjusted if the number of lines per page is not fitting.
Rotation
This again should already have been selected when you defined your Page Setup.
Start printing on line (SCS)
If you wish to move your spooled file data down the page to allow for a pre-printed logo then enter a start line number here.
Font Group (AFP, HPT)
The default of *DOC should be left as you will have defined your Font Group in your Page Setup.
Printer Resource (AFP)
Please leave as *DOC. Printer Resources were used prior to v4.2 in the native AFP environment to speed up the printing process.
No Print Border (HPT)
The default of *DOC should again be left as this is defined in your Page Setup.
Duplex (AFP HPT)
If your printer is capable of printing duplex then you may select this facility. Using duplex printing causes the printer to print pages alternately on the Front and Back of the paper. It may be necessary to print a blank page to ensure the next page is printed as required. Note: PDF Datastream does not honour the duplex flag. This is because the “printer device type” is *USERASCII. The only way to print a pdf datastream file in duplex is to set the printer to print duplex by default. Documents printed from a PC or through *HPT will specify simplex or duplex and will print correctly. PDF Datastream documents will not specify simplex or duplex and will thus default to duplex.If you also want to print simplex pdf datastream documents you’ll have to output a blank page in between each page to emulate it.
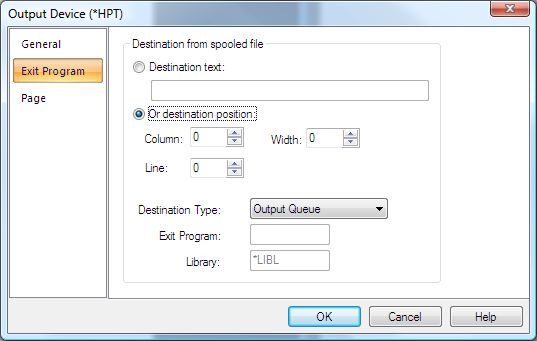
On the Exit Program tab you will see the following entries:-
Destination Text
The Destination text is only used if you wish to hard code an Output Queue or Destination string to be passed into your Print Exit program. .
Destination Position
This has been replaced by the Print Destination Address tool, which will complete these entries.
Destination Type
The default Destination Type of Output Queue is used for normal printing, but if you wish to override the output queue dependent upon data on the page then you can call an Exit Program. Select Exit Program as the Destination type and enter a valid program name and library where it resides.
Note: If you wish to remove the data you have selected to define your Print Destination, from the Output, select the relevant entry suffixed with (Delete).
Exit Program / Library
If you have specified Exit Program as your Destination Type then you need to specify the name of the Exit Program and the Library. The parameters may be passed into the Exit program using the Address tool to select data from the Output pane of your CPPD document. Please see Cobwebb Print Exit Program topic for more details.
Note 1: If you wish to pass back an Output queue and library then the Printer Device must be *JOB. The parameters passed back must be valid entries as when using the OVRPRTF command.
Note 2: If you need to add more than one library to your library list, because the files used in the program reside in another library, then you will need to add them in your program.
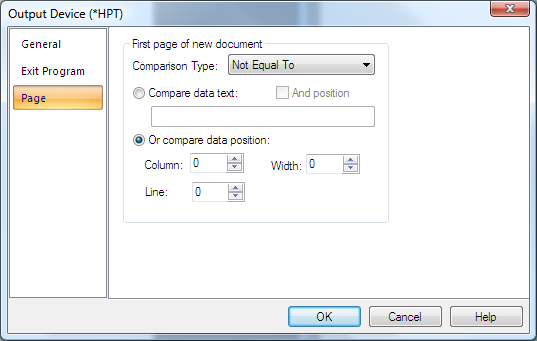
The Page tab is where you may set up the splitting up of your output pages into individual print files. If, for example, you are sending a Purchase Order print to a number of different Output queues you would need to split the original spooled, some may only be one page whilst others may be more. You need to select some data from your output pane, say Purchase Order Number, which appears on every page. You then need to select ‘Not equal to’ as the comparison type and on change of Purchase Order Number a new spooled file will be generated. This has been replaced by the First Page Address Tool.
Please refer to Configuring Page Selection for a more detailed explanation.
Comparison Type
Displays the type of comparison operation required to distinguish the first page of a new document in the output file. The most commonly used entry is Not equal To as you would normally want to split up your documents when the area of the spooled file selected (using Compare data position) is not equal to that of the previous page e.g. Purchase Order Number.
Note: If you wish to remove the data written to the output to define your page selection then you need to use one of the entries with (Delete) on the end.
Compare data text
Displays the text string that is to be used in the comparison operation. Each page is scanned in turn for this text. Every page that this text is found on is considered the first page of a new document. If you only wish to check for this text in a particular position on the spooled then tick the And position box and enter Column, Line & Width. If you are using Compare data text then you would usually have the Comparison Type set to Equal To e.g. Page 1.
Compare data position
Displays the area from the output spool file that is to be used in the comparison operation.
This position is checked on each page. Whenever there is a difference between the text at this position, the page on which the change took place is considered the first page of a new document.
See Also
