Please enable JavaScript to view this site.
When the Cobwebb Server Software has been installed successfully you will be given the option to press F4=Configuration Wizard to call the Server Configuration Wizard. You may press F3=Exit to exit the Server Configuration Wizard at any time to return to the main System Installation Wizard.
The Configuration Wizard may also be acessed from the Cobwebb Main Menu - Option 7.
Note: All of the entries in the wizard may also be configured via various CPPD menu options at a later date if required but the wizard covers all of the main areas.

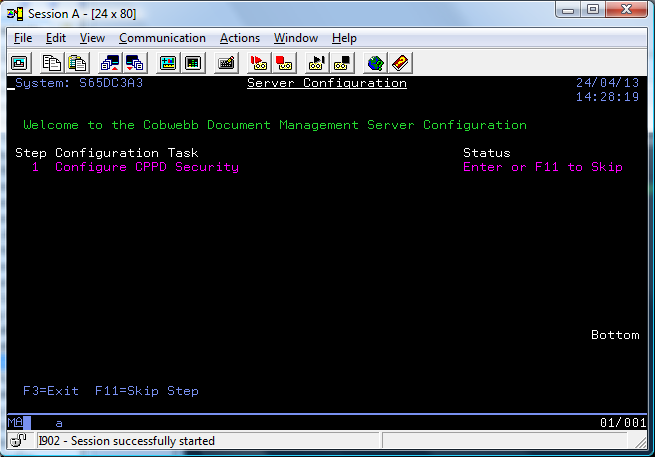
Configure CPPD Security
The first task is to Configure CPPD Security. If you are performing an upgrade and are not adding any extra modules, i.e. already have a valid Security Code, then you may skip this step by pressing F11=Skip Step. If you are doing an install then this step must be performed otherwise the wizard will not know which configuration options are required.
If you do not have a valid Security Code then you will see the following message and you will not be able to continue with the wizard:

Once you have completed, or skipped, this step the wizard will work out, depending upon your configuration, which further steps are required.

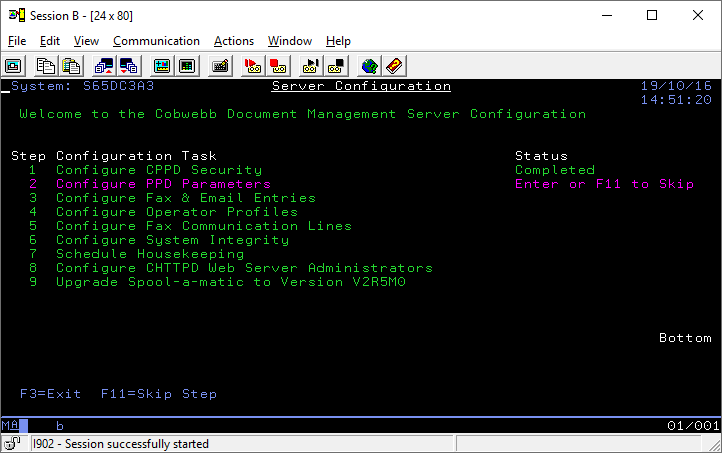
Press Enter to perform the Step in pink or press F11 to Skip this Step and go on to the next step in the list.
Configure PPD Parameters
This Step allows you to configure the PPD Parameters for your setup. Please see Work with PPD parameters for details.
Configure Fax & Email Entries
This Step will only be displayed if you have either the Fax or Email Interface enabled and enable the configuration of your Fax and/or Email settings. You will find all of these entries under the System Parameters.
Queue Reference length
Here you can specify the number of digits you wish to use for your Fax and Email unique reference. This reference will be prefixed with either a S or E for Fax and Email respectively and then you can choose to display between 5-9 digits e.g. E999999999. Note: The larger the number the greater the capacity of the Cobwebb Message Queue.
Fax Settings
This entry will only be displayed if you have the Fax Interface enabled and allows you to configure your Fax settings.
PABX Access code
Specify up to 3 characters to be inserted before every fax number. If necessary a pause characters can be included (see Fax Destination field in the Send a Fax Screen). The PABX Access code will be ignored if an 'I' is inserted in the first character of the Fax Destination field.
Email Settings
These entries will only be displayed if you have the Email Interface enabled and allows you to configure the details for your SMTP Mail Server.
SMTP Mail Server
Enter the IP address of your SMTP Mail Server E.g. 192.255.255.1
SMTP Port
Enter the Port number of your SMTP Mail Server.
SMTP Encryption
From v6.2.81. Decide the type of encryption you wish to use to send email.
0 |
No encryption (default). |
1 |
Use SSL/TLS encryption. |
2 |
Use STARTTLS. |
SMTP user name
If your SMTP server requires user authentication then please enter a valid user name here.
SMTP password
If your SMTP server requires user authentication then please enter a password for the above user name.
Configure Operator Profiles
This Step will only be displayed if you have either the Fax or Email Interface enabled. Here you can configure the User Profiles you wish to have Operator privileges. Please see Operator Profiles topic for details.
Configure Fax Communication Lines
This Step will only be displayed if you have the Fax Interface enabled. This is where you configure the details of your individual Fax Communication lines Please see Communication Lines topic for details.
Configure System Integrity
This Step will only be displayed if you have either the Fax or Email Interface enabled. You will find these entries under the System Parameters.
Archive sent messages
The number of days outgoing messages are left on the queue before being moved to the Archive Queue. This is used in the Housekeeping Menu options Archive Queue Entries and Schedule Housekeeping - sub option Archive the CPPD Queue.
Clear if older than (days)
Specify the number of days for which you wish to keep messages on the queue. This is used in the Housekeeping Menu options Clear Queue Entries and Schedule Housekeeping - sub option Save & Clear the CPPD Queue. [CLRPPDQ and RGZPPDQ commands respectively]
Schedule Housekeeping
This Step will only be displayed if you have either the Fax or Email Interface enabled. This Step allows you to configure Scheduled Jobs to run your Housekeeping. Please see Schedule Housekeeping topic for details.
Configure CHTTPD Web Server Administrators
This Step will only be displayed if you have the Web Interface enabled. Here you can configure the User Profiles you wish to be Administrators of the CHTTPD Web Server. Please see CHTTPD Web Server Administrators topic for details.
Install / Upgrade Spool-a-matic version VnRnMn
This Step will only be displayed if you have the PDF Interface enabled. The wizard will check for the appropriate version of Spool-a-matic for your IBM i version. If you already have the correct version installed then you will not see this Step. The Step will only be displayed if you do not have Spool-a-matic installed or if there is a newer version for your IBM i. Please see Installing Spool-a-matic topic for details.
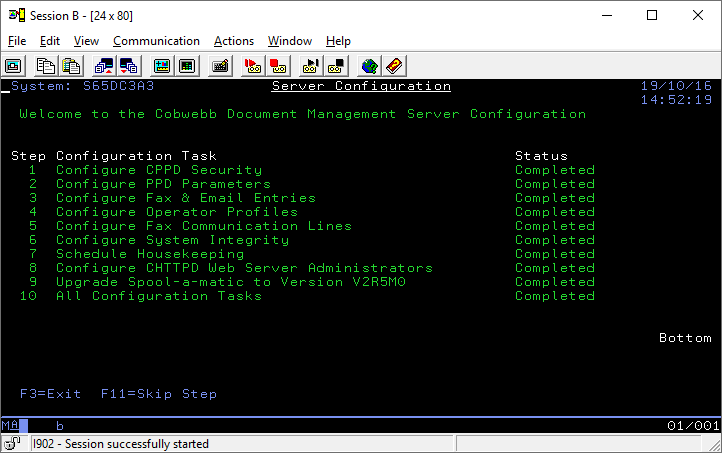
Configuration Wizard Completed
When you have finished you will see a new Step saying All Configuration Tasks - Completed. Press Enter and you will be returned to the main main System Installation Wizard.

