Please enable JavaScript to view this site.
|
Generate a Certificate using OpenSSL and Microsoft Active Directory Certificate Services |
Scroll Prev Top Next More |
In order access the Cobwebb Web Server using HTTPS you may either:
•Use the supplied default certificate and key which has been created using a Self-Signing Certificate - this is not the ideal solution as you will receive varying security errors depending upon the browser you are using e.g. "This site is not secure" or "Your connection is not private".
•Generate a Certificate for the Server using a Certificate Authority - this gives you true https security.
Prerequisites
•OpenSSL - or other software capable of generating private keys and certificate requests. Windows binaries can be found in the openssl wiki and pick a download location. For example select https://indy.fulgan.com/SSL/ and then the openssl-1.0.2r-x64_86-win64.zip.
•A Certificate Authority - Here at Cobwebb we have installed the Microsoft Active Directory Certificate Services. Installation instructions are beyond the scope of this document, but there are many walk through's on the internet, like this and this.
Assumptions
This topic assumes that you will be using OpenSSL and Microsoft Active Directory Certificate Services. In our examples we are using the following so you will need to replace this with your own details.
Please create the two folder locations as these will be required in the following steps.
Server Name |
e.g. M15.cobwebb.local |
Open SSL Installation folder |
C:\Users\User.Name\Documents\OpenSSL (replacing User.Name with your Windows User Name) |
SSL Certificate storage location |
C:\Users\User.Name\Documents\Certificates (replacing User.Name with your Windows User Name) |
Steps to Generate your Certificate
There are various steps that need to be taken to create a certificate for use with the Cobwebb Web Server and these are outlined below:
•Create an SSL Configuration file
•Request a Certificate from a Certificate Authority
•Install & Configure the SSL Certificate and Key on the Cobwebb Web Server
Browse to the openssl wiki where the Windows binaries can be found. We selected the https://indy.fulgan.com/SSL/ and then the openssl-1.0.2r-x64_86-win64.zip.
Download the .zip file and extract to the OpenSSL installation folder you have just created.
We are going to use OpenSSL to create a Private Key which will be used to create your Certificate Request.
From a command prompt run the following replacing the User.Name and Server.Name with your replacements:
"C:\Users\User.Name\Documents\OpenSSL\openssl" genpkey -algorithm RSA -out "C:\Users\User.Name\Documents\Certificates\Server.Name.key" -pkeyopt rsa_keygen_bits:4096
Note: You can ignore the warning about not being able to open the config file.
This should generate a file C:\Users\User.Name\Documents\Certificates\Server.Name.key beginning with the text:
-----BEGIN PRIVATE KEY-----
Create an SSL Configuration file
Now we need to create an SSL Configuration file for the server C:\Users\User.Name\Documents\Certificates\Server.Name.openssl.cnf .
•Open a Text Editor such as Notepad ++
•Copy the following contents and paste into the Text Editor
•Replace the entries in red with your details and removing / adding entries for your configuration - see Entries Explained below for details on each configuration entry.
•Save the file as Server.Name.openssl.cnf in the C:\Users\User.Name\Documents\Certificates\
[ req ]
default_bits = 2048
prompt = no #If this is set to yes the command will prompt you, with the values in 'req_distinguished_name' set as suggestions (but you will still need to type them in)
distinguished_name = req_distinguished_name
req_extensions = req_ext
[ req_distinguished_name ]
C = UK
ST = Kent
L = Tonbridge
O = Cobwebb
OU = IT
CN = server.domain
[ req_ext ]
subjectAltName = @alt_names
[alt_names]
DNS.1 = server.domain
DNS.2 = server
Note: If you require further information please see Open SSL Configuration.
[ req ] section |
|
C |
Country Name |
ST |
State or Province |
L |
Locality |
O |
Organisation |
OU |
Organisation Unit / attribute |
CN |
The fully qualified domain name of your Cobwebb Web Server - This entry is mandatory. |
[ req_ext ] |
This section is only required if you wish to configure a Multiple Domain Certificate where you will then need to specify each Domain Name or IP Address |
DNS.1 |
Domain Name 1 |
DNS.2 |
Domain Name 2 |
IP.1 |
IP Address 1 |
IP.2 |
IP Address 2 |
The next step is to use the Private Key and SSL Configuration file that we have just created to create a Certificate Request.
From a command prompt run the following replacing the User.Name and Server.Name with your replacements
"C:\Users\User.Name\Documents\OpenSSL\openssl" req -new -key "C:\Users\User.Name\Documents\Certificates\Server.Name.key" -out "C:\Users\User.Name\Documents\Certificates\Server.Name.csr" -config "C:\Users\User.Name\Documents\Certificates\Server.Name.openssl.cnf" -nodes -sha256
Note: You can ignore the warning about not being able to open the config file
This should generate a .a file C:\Users\User.Name\Documents\Certificates\Server.Name.csr beginning with the text:
-----BEGIN CERTIFICATE REQUEST-----
Use the generated Certificate Request to request a certificate from a Certificate Signing Authority. Here we are going to be using the Microsoft Active Directory Certificate Services.
•Open the .csr file in a Text Editor such as Notepad++ and copy the contents to the clipboard.
•Browse to the Certificate Authority

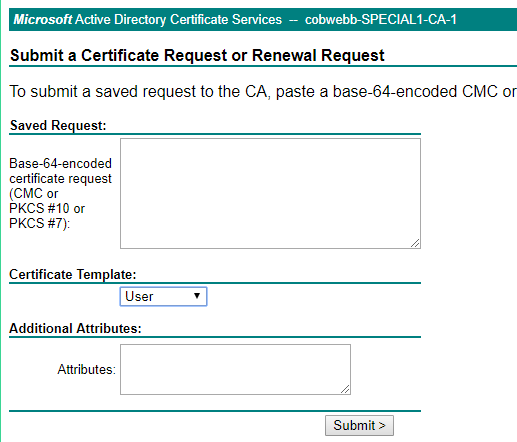
•Paste the contents of the Certificate Request into the box provided and select Web Server from the list of Certificate Template entries. Note: If you don't see the Web Server option then you may not have the correct permissions so please see Granting Permission to the Web Server Template below:
•Click Submit.

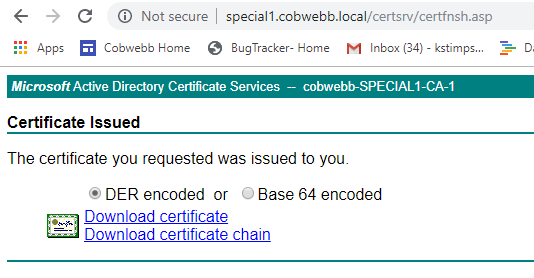
•Download either the DER or the Base 64 encoded certificate (The Cobwebb Web Server seems to support either) and select Download certificate.
•This should generate a .cer file in your Downloads folder beginning:
-----BEGIN CERTIFICATE-----
•Browse to your Downloads folder and rename the certnew.cer to server_name.cer e.g m15.cobwebb.local.cer and copy it to your Certificate Store location e.g. C:\Users\User.Name\Documents\Certificates
Granting Permission to the Web Server template
Note: These steps are only required if you cannot see the Web Server entry when Requesting a Certificate above.
•On the Certificate Server machine:
•Right click on Start and choose Run
Certtmpl.msc
•Right Click on the “Web Server” template and choose Properties
•Select the Security tab
•Make sure your user has Write and Enrol permissions
